Onboarding guide for teams#
This guide describes some best practices for getting your team started with Neptune.
Setting up projects#
A project is typically suitable for one machine learning task or problem that you're solving. Each project comes with the following sections:
- Runs, with different view modes for inspecting and comparing the runs.
- Models, with a table view for each model's versions.
- Project metadata, for storing and displaying metadata that applies on project level.
- Notebooks, for tracking Jupyter notebooks.
Creating and naming multiple projects#
Consider a naming convention for your projects. If your organizational project would consist of several Neptune projects, it's a good idea to add some kind of prefix, such as rnd-defaultprediction.
We also recommend providing a short description. This makes navigating through multiple projects easier. A good description is concise and contains key reasons or ideas behind a particular project.
Limiting storage per project#
To ensure that an individual project does not take up too much storage space, you can set a limit in the project settings () → Manage project usage.
Setting up users and access#
Inviting people#
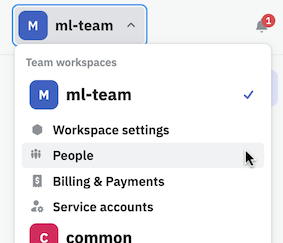
As a workspace admin, you can invite people through the workspace settings in the top-left corner.
You can find any registered users by their Neptune username, or invite new users by entering their email address.
For instructions, see Invite people.
Users or service accounts#
If you need to use multiple API tokens or non-user tokens, you can set up one or more service accounts in your workspace. This helps automate and improve the security of your workflow, as you can disable or refresh the API token of a service account at any time.
Learn more:
Assigning people to projects#
If your plan includes project level access control, each project has an additional visibility setting: "Private". This means that only users specifically assigned to the project can access it.
On the low-tier plans that don't include project level access control, projects are shared between every workspace member. In this case, you can choose whether a project is completely public or accessible only by the workspace members.
Service account note
Unlike user accounts, service accounts always need to be explicitly assigned to a project in order to access it.
Team guidelines#
Neptune provides a lot of flexibility when it comes to logging data. However, with flexibility comes responsibility.
Especially at the beginning of a new project, it's a good practice to establish standards when it comes to what data should be logged. This helps everyone efficiently browse, analyze, and compare results of experiments later.
Maintain a list of project metrics#
The runs table gives an overview of all your logged runs and metadata. To have nicely configured views of the table, where all runs of a view have values in all the columns, make sure everyone follows the same naming conventions for logs. Runs may or may not include those metrics, but if they do, they should use a name that belongs to the list of accepted names.
This way, you can avoid situations where you end up with multiple labels for the same thing, such as MAE and Mean-Absolute-Error.
Project metadata tip
You can store the suggestions from the above tips in the Project metadata section. The benefit of this strategy is that you can access the "allowed" lists via API, directly from the target project where the runs are being logged.
project = neptune.init_project(project="ml-team/classification")

metric_names = ["acc", "loss", "mae", ...]
project["allowed/metrics"].extend(metric_names)
project = neptune.init_project(project="ml-team/classification", mode="read-only")

list(project["allowed/metrics"].fetch_values()["value"])
For further instructions, see Log project-level metadata.
Maintain a dictionary of tags#
To enhance experiment grouping for further analysis and comparison, it's a good idea to use tags.
As the number of tags can grow during the project lifetime, we recommend standardizing their usage. To start, simply list tags that are allowed in the project and provide a simple rule of working with tags. For example, "every experiment should have at least one tag from a certain group".
It's also a good practice to provide a short description of the tags listed.
Setting up the Neptune client library#
The Neptune client library (neptune ) generally needs to be installed on the system where the model training happens. For installation instructions, see Install Neptune.
You can use the Neptune API via the core neptune library or an integration library (or both in combination). More on that in the Integrations section below.
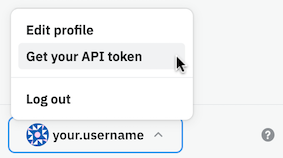
Authentication#
To authenticate when using the Neptune API, you need to provide the API token associated with your user or service account. You also need to specify the Neptune project path, which is typically given in the form workspace-name/project-name. With these, Neptune knows where to send the data and can check whether the account has access there.
Connecting to self-hosted Neptune
Authentication is no different when connecting to self-hosted Neptune, as API tokens obtained from the local installation contain the address to the self-hosted instance.
Environment variables#
As a best practice, you should at least set the Neptune API token to the NEPTUNE_API_TOKEN environment variable on your system. See Set Neptune credentials for detailed instructions.
You can also set the project, custom run ID, and logging mode through environment variables. For the complete list, see Neptune environment variables.
Integrations#
Besides logging metadata manually, you can use Neptune's integrations with various machine learning frameworks to log all relevant metadata automatically. This way, the team saves a bit of work because they don't need to develop logging for the library in question.
Using an integration also ensures standardization of logging.
The integrations include deep learning frameworks like TensorFlow, Keras, PyTorch, PyTorch Lightning, Transformers, as well as many other popular libraries – for example scikit-learn, LightGBM, Optuna, Prophet, and Apache Airflow.
See the Integrations tab for the complete (and growing) list.
Getting started with runs#
What you can log and display#
Neptune supports logging of various types of metadata. The display options in the Neptune app depend on a couple of things:
- The data type and format
- The method you use for logging it to Neptune
Learn more about logging methods and types in Essential logging methods and Field types.
Automatically logged metadata#
Neptune runs log certain metadata by default, such as system metrics, the source code used to initialize the run, and Git information.
You can control and disable these options as needed. For details, see What Neptune logs automatically.
Scripts vs interactive sessions#
Neptune behaves a bit differently depending on whether you're executing a script or using an interactive kernel. In the case of notebooks or interactive Python sessions, things like source code and console logs will take some extra steps to track. For details, see the neptune.init_run() reference.
Beware that it's easier to accidentally leave runs "hanging" in interactive sessions, as the connection to the Neptune server remains open until you call stop() on the run (or the kernel stops).
When using scripts, Neptune automatically stops any initialized runs or other objects when the script finishes execution.
Summary
- Use integrations whenever available to further increase standardization of logging and save time (no need to develop/maintain it).
- Keep a record of accepted metric names (
accvsaccuracy) and what to do if someone wants to log a metric that is not on the list. - Keep a record of accepted tags and what to do if someone wants to add a new tag.
Defining a custom init_run() function#
To ensure that certain fields are always created and populated, you can set up a custom initialization function that wraps init_run().
This makes things easier for your developers and ensures consistency between metadata logged by different people.
For instructions, see Add Neptune to your code: Defining a custom init_run() function.
Working with runs#
Viewing runs in the table#
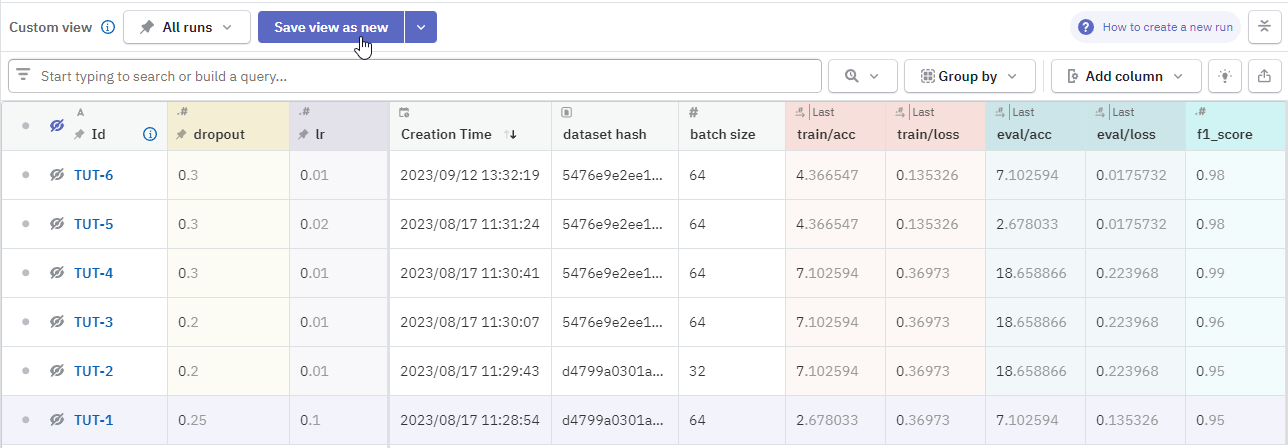
Metrics and data logged to the run can be displayed in the runs table as a column. What is more, you can have multiple views of the table with different sets of columns and filters applied. The number of views can grow pretty quickly, so your team should have an agreement on when to create new views.
You may want to have a main view with the project's "must include" metrics. You can pin and display it as the default view for everyone in the project.
Aside from added columns and filters, custom views also remember sorting order. If you are optimizing for a certain metric, you may want to sort by that column and save this setting, so the "top performing" run will stay at the top.
When to create custom views#
A custom view represents some context or particular perspective within the project. With that in mind, create a new view every time you work on an idea or larger task that is separable from other tasks in the project.
For example, if you play with some network architecture, say Mask R-CNN, you may want to create a view that displays hyperparameters and metrics only for Mask R-CNN experiments. As a result, when experimenting with Mask R-CNN, you can simply go to this view and see only relevant information.
Tip
Thanks to Neptune's persistent URLs, you can also share links to views. This way, your collaborators can see exactly the same table view that you're seeing.
Visualizing metadata and files in dashboards#

Apart from the runs table, the two other view modes drill deeper into the runs' metadata:
Run details – inspect one run at a time.
Compare runs – select specific runs to compare and choose between various visualization options. This is the way to compare multiple runs in a single view.
In the prebuilt dashboards, Neptune displays metadata of a certain types (such as images, artifacts, series of values) but you can create custom dashboards to visualize any logged metadata. You can arrange the widgets as you like and customize various display options.
Saved dashboards are available to everyone in the project.
Tip
If you have a more complex piece of metadata that you want to compare between runs, such as the contents of a file, create a custom widget ( Run details → New dashboad → Add widget) and then flip manually between the runs to compare them one by one.
You can preview for example parameter tables, file contents, value lists, and tabular data.
Pin columns to mark them as important#

Pinned columns remain visible even when you switch to the detail or comparison view modes.
Fields of pinned columns also show up in the legend on charts. To have a human-readable way of identifying runs, you can create custom run names, then add and pin the sys/name column.
Tip
In the app, you can add a name, description, and tags through the run information view.
Resuming or updating existing runs#
You can update a run that you already closed.
In practice, it means that you can go back to an experiment that was run a few weeks ago, reopen it and push more metrics and other data to it. Such an option is particularly useful in case of fine tuning the existing model, adding more evaluation data to the trained model, or resuming the training from a checkpoint.
You can reinitialize an existing run by passing its run ID to the with_id argument of the init_run() function.
Learn more
Downloading run metadata#
You can download some metadata directly from the app, although querying the API provides more options and flexibility.
Get started with the following how-tos:
Model registry#
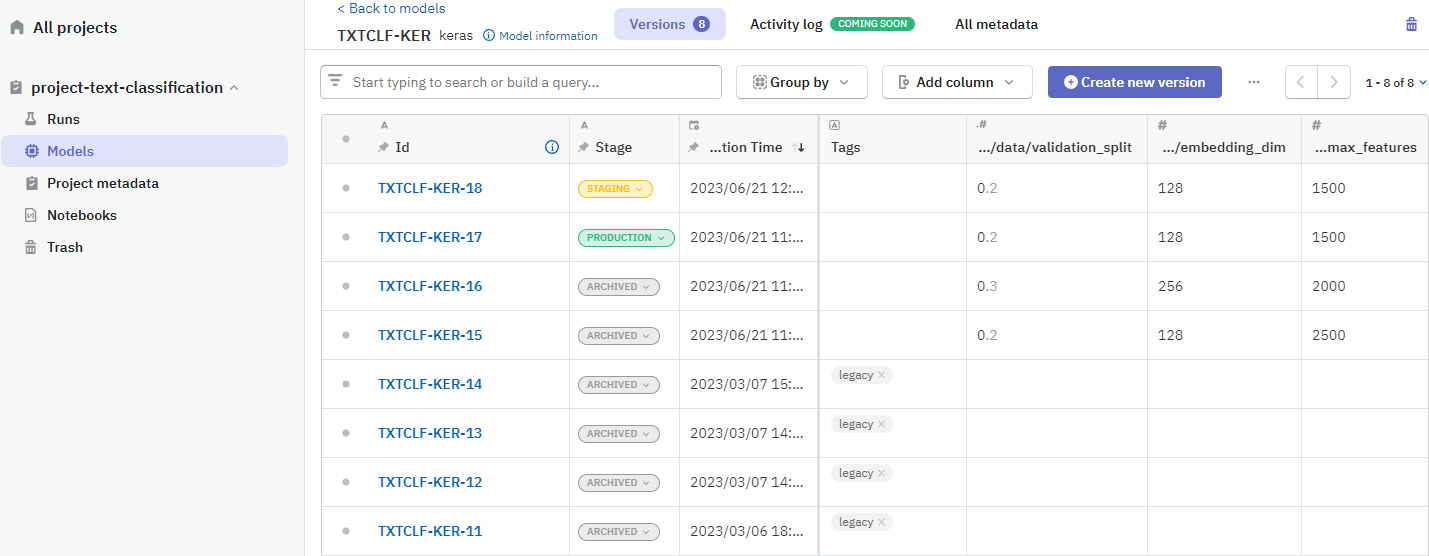
To separate experimentation metadata from more persistent model metadata, you can organize it in the Models section of your project.
When you create versions of your models, these are displayed in a table and you can manage their lifecycle using stages.
Learn more:
Project metadata#
You can also use the Neptune API to log data that applies on project level. You do this by initializing the project just like a run, then using the available logging methods to store data in the project.
This enables the team to keep a single source of truth for things like artifact versions. The logging can be set up to fetch datasets or parameters from the project's metadata to ensure consistency between runs within the project.
To learn more, see Log project-level metadata
When to track a checkpoint?#
It's good to upload a checkpoint every time you want to:
- share that state of the notebook with your teammates.
- persist with the results, for later analysis or reference.
- compare the notebook checkpoint with a different one.
Naming convention for notebook and checkpoints#
The notebook's name should summarize tasks being approached in the notebook. For example, "EDA - Titanic dataset" or "Tuning - Optuna". You might use the JIRA issue ID as a first approximation.
For the checkpoint, think of it as Git commit. You want to write a very short and coherent summarization of what it represents. For example, "High learning rate" or "Add new time-based features to the training set".
When things go wrong#
Storage quota is exceeded#
If your team logs more metadata than expected, you may run out of storage space in your Neptune workspace or project. One thing to note is that trashed items still count toward your storage; you need to empty the project trash to delete the items completely.
You can always add more storage to your subscription plan.
Tip
We also provide a guide for how to manage storage → Storage troubleshooting and tips
Connectivity issues#
If there is some problem with sending logged metadata to the Neptune servers, Neptune generally stores the data locally. You can use the Command Line Interface to manually upload it later.
Learn more: Neptune CLI
My team encountered an error#
We provide help pages for some common error situations.
For details, see Errors, warnings, and other messages
How to debug#
If you suspect any issues with the Neptune API, you can run your script in the debug connection mode. This turns off Neptune logging so you can verify if the problem was with Neptune or with your script.
For details, see Debugging options.
FAQ and help#
If you're facing problems or have questions, we're here to help.
You'll find tips, answers, and ways to get in touch in the Help tab of the docs.
Related guides
- Privacy and security information – learn how to control what is tracked and how you can manage access to the logged data.
- Best practices – recap of best practices when using the Neptune API.
- Neptune Tutorial – complete guide for a new Neptune user. Start from installation, learn how to log different types of metadata, and explore the results in the app.